
The Blinking LED
Arduino Coding Project #1
Goal:
Make a blinking light through circuits on a breadboard and coding sent through an Arduino board.
Materials:
Arduino set with breadboard
Arduino USB cable
Computer/mobile device
1 LED
1 330ohm resistor
 3 wires
Procedure:
1. Assemble the circuit:
LED "+" (longer leg) in c2 and
LED "-" (shorter leg) in c3
330ohm resistor in a3 and "-" vertical column of breadboard
jumper wire from "GND" on Arduino board to "-" on breadboard
jumper wire from "5V" on Arduino to "+" on breadboard
jumper wire from "Pin 13" to "e2" on breadboard
connect the Arduino board to the computer via the USB cable

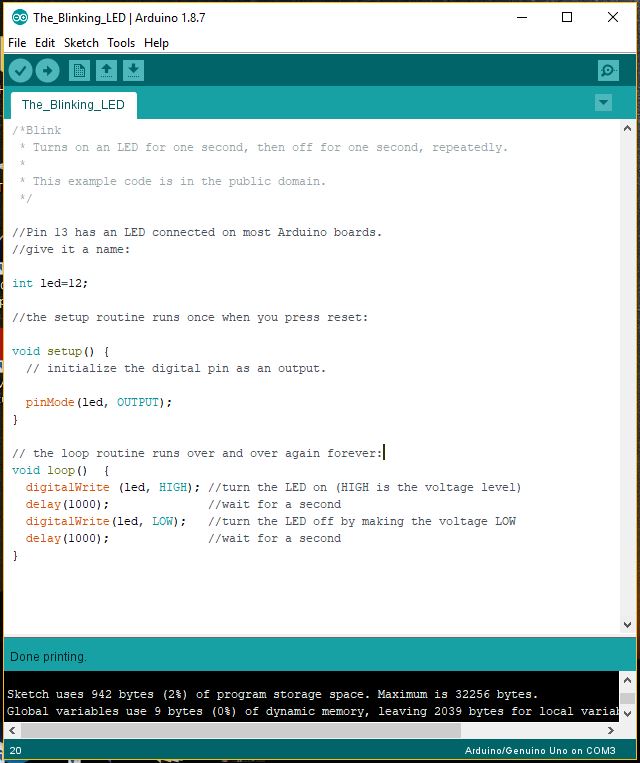
2. Write the code:
Using the Arduino IDE program,
create a file, type in the code
on the right. Verify it. If no
errors need to be fixed, upload
the code to the Arduino board.
3. Upload and test it all
Watch to see if the light blinks.
If the LED does not light up,
check the code and check that the
wiring is correct. Pay careful
attention to the placement of each
piece.
1. Assemble the circuit:
LED "+" (longer leg) in c2 and
LED "-" (shorter leg) in c3
330ohm resistor in a3 and "-" vertical column of breadboard
jumper wire from "GND" on Arduino board to "-" on breadboard
jumper wire from "5V" on Arduino to "+" on breadboard
jumper wire from "Pin 13" to "e2" on breadboard
connect the Arduino board to the computer via the USB cable
2. Write the code:
Using the Arduino IDE program,
create a file, type in the code
on the right. Verify it. If no
errors need to be fixed, upload
the code to the Arduino board.
3. Upload and test it all
Watch to see if the light blinks.
If the LED does not light up,
check the code and check that the
wiring is correct. Pay careful
attention to the placement of each
piece.
We played around a lot with different aspects. Below are a few. I'll leave the reader to discover the outcomes by trying these out or watching our video. If you have any questions, leave a comment below. Remember to only change one thing at a time both in troubleshooting and experimenting.
Circuit Play
- What happens if you turn the LED around (reverse the wiring)?
- What happens if you remove the positive lead from the breadboard? Does the circuit still work?
- What happens if you place the resistor to the positive side of the LED and simply used a wire to run back from the LED to ground? When you do this, you will need to change up the wiring a little so check this closely to make sure you have not shorted out the circuit.
- What happens if you move the wire from port 13 to port 12 on the Arduino?
Code Play
- If you moved the wire from port 13 to port 12 on the Arduino, what do you need to change in the code?
- What happens if you change the two delay code lines from delay(1000) to delay(2000)? Take out a stop watch or timer of some sort and time the rate of blinking for each of these settings. How many times does the LED blink in a minute for each of these settings? What have you learned about the value that is placed between the parenthesis after delay()? What value (parameter) would you place in delay() if you wanted the LED to blink at a rate of once every 3 seconds? How about every half second?
- What happens if you place // before the words void setup()?
- What happens if you place // before the words void loop()?
- What happens if you remove the last curly brace “}” in the program?
- What happens if you place a // before pinMode(13,HIGH) in setup()?
- What happens if you changed HIGH to high on the pinMode(13,HIGH) line?
- What happens if you change the word pinMode to pinmode in pinMode(13,HIGH)?
[video of working project to be added after it finished processing from phone to YouTube!!!!]
Extension Challenge
There are a couple ways you can go with this. You can do any or all of this depending on how much you want to play.


There are a couple ways you can go with this. You can do any or all of this depending on how much you want to play.
- Augment the circuit by adding an LED or two
- Make it so that two LED’s blink at the same rate
- Make it so that two LED’s blink at different rates
- Make it so that one LED blinks while the other LED simply stays on


5. Create a circuit and program that does all of the above.

Reflection:
I learned to not be intimidated by so many words! You just have to start and try one step at a time. I also learned to allow for technical difficulties like it taking several hours to load one video from my phone to the YouTube channel. I should also use my reading glasses when finding the ground wire. ;)

Mostly, I had a lot of fun. The main video cuts off when we were playing with the code. I really like the journey and how my youngest discovered on his own the importance of capitalization and punctuation in coding.
Using the model of changing one thing at a time has become our Arduino mantra. I'm looking forward to the next adventure.
Below is unpacking the box and checking out the components. It's always a good idea to make sure your kit is complete before you start tinkering just in case you need to send it back for a new one.

Comments
Post a Comment